

Looking for a perfect Uber clone script? Well, one of the most important features of an uber clone script is the Corporate DASHBOARD feature. Let’s take a look at how to use this feature on the software you are planning to use.

First, you need to understand what a corporate account feature is. If an affiliate / third party business owner has got their own set of driver and wants to signup their drivers under your company, then the admin of your company has to first open a corporate account for the business owner and then add the affiliated drivers under them.
With the help of a corporate account, you as a business owner can manage all the details of the affiliated drivers.
First, you need to install the setup. Once you are done with the setup, launch the admin panel to explore all the features. If you want to know how to try this feature, check this post.
Step 1: The user has to enter the web URL to launch the admin panel, after which the login screen appears which is similar to the one displayed below.

Step 2: Then the user has to give the registered email id and password to log in to the admin panel. After the user successfully signs in, he will find a dashboard that looks similar to the one displayed below.
On the right-hand side, a user can find a navigation bar containing a lot of items. Now, all the user has to do is pick a particular item and explore its functionality.

Step 3: Now a user or an admin can view all the drivers that are currently affiliated with the company by clicking on the View Corporates tab. As you can see the entries are in a row-wise manner and at the end of each row to the right-hand side there is an action button.
If an admin wishes to view or delete an account all he has to do is choose the right option


Step 4: To add a new account the admin has to choose to Add a corporate option from the menu. This will lead to a page where the admin can fill all the necessary details.

Step 5: Now the admin has to enter the web URL for the corporate dashboard management panel. Once the login credentials are entered it will lead to a dashboard which looks like the one displayed below. To the left-hand side of the dashboard, the admin can find a navigation bar containing a lot of items.


Step 6: The first feature to explore is the stats feature. This feature shows the availability of the providers around the globe. It can be customized to a particular city also.

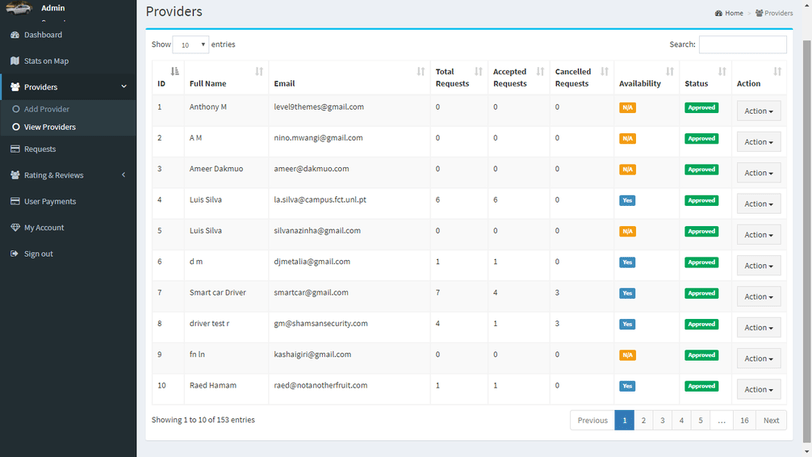
Step 7: In order to view all the registered providers, the admin can click on the view providers item. This will open a page containing a list of all the registered providers. All the entries are in a row-wise manner and at the end of each row, there is an action button which gives some more additional features.

Step 8: Now to add a new provider, the admin has to choose the Add provider option from the panel. This opens a page containing all the necessary details to be filled. Once an admin hits the submit button a new provider is added to the system.

Step 9: The next one to explore is the request feature. The request button on the panel opens a page containing all the requests that are made to the current date. To the rightmost side of each entry, there is an action button which has an option to view the details of a request.
On this page, the admin can find a detailed account of the service request on top and a map at the bottom shows the geographic location where the service was delivered.


Step 10: Next is the Rating & Reviews item. From this item, the admin can choose the User reviews and Provider reviews tab which leads to the respective pages.
On the user reviews page, all the entries are made in a row-wise manner. Each entry contains details like provider name, username, rating and a comment section along with an option to delete the entry.
The Provider reviews page contains all the entries which are in a format similar to the User reviews page.


Step 11: An admin can find the payment details from the User payments tab. It contains a complete recorded history of all the payments made by the users including the transaction id and the mode of payment.

Step 12: The last feature to explore is the Account tab. From this tab, an admin can find all his details along with an option to update his profile, image, and password.
FAQ’s
Why do I need a Corporate Dashboard feature?
As a potential business owner, you need to maintain the record of all the resources provided by the affiliate business partners. You as an admin can open a corporate account for every driver who is associated with your company from your affiliate partner. As a result of which it will be convenient to maintain and track the activities of the drivers.
Why is there a separate admin panel for Corporate Dashboard management?
The corporate dashboard has numerous features bundled into it. So the designers have made a separate admin panel to isolate it from the original admin panel. In this way, it becomes more convenient for an admin to manage the corporate accounts.
Who are the affiliate partners?
The affiliate partners are the business owners who are providing the resources like drivers and running their business through you.
Is this feature available to the affiliate business partners also ?
No, the corporate dashboard feature is available for the potential business owners only.
Do I need a smartphone to access the admin panel?
No, as this is a web-based feature it is not necessary to have a smartphone. You can access the panel from a laptop or any other portable computing device.